Documentation has been added detailing how to use the different database
backends available. A minor gramatical error was also corrected.

Signed-off-by: Matthew Nickson <mnickson@sidingsmedia.com>
5.8 KiB
![]()
wireguard-ui
A web user interface to manage your WireGuard setup.
Features
- Friendly UI
- Authentication
- Manage extra client's information (name, email, etc)
- Retrieve configs using QR code / file
Run WireGuard-UI
Default username and password are admin.
Using docker compose
You can take a look at this example of docker-compose.yml. Please adjust volume mount points to work with your setup. Then run it like below:
docker-compose up
Note:
There is a Status option that needs docker to be able to access the network of the host in order to read the
wireguard interface stats. See the cap_add and network_mode options on the docker-compose.yaml
Environment Variables
Set the SESSION_SECRET environment variable to a random value.
In order to send the wireguard configuration to clients via email, set the following environment variables:
- using SendGrid API
SENDGRID_API_KEY: Your sendgrid api key
EMAIL_FROM_ADDRESS: the email address you registered on sendgrid
EMAIL_FROM_NAME: the sender's email address
- using SMTP
SMTP_HOSTNAME
SMTP_PORT
SMTP_USERNAME
SMTP_PASSWORD
SMTP_AUTH_TYPE
EMAIL_FROM_ADDRESS: the sender's email address
EMAIL_FROM_NAME: the sender's name
In order to connect to a database, set the following environment variables:
DB_TYPE
DB_HOST
DB_PORT
DB_DATABASE
DB_USERNAME
DB_PASSWORD
DB_TLS: the TLS option
For details on the values that these variables should be set to, see the section for your desired database.
Using binary file
Download the binary file from the release and run it with command:
./wireguard-ui
Databases
By default, all the data for the application is stored in JSON files in
the ./db directory. By using the --db-type command line option or by
setting the DB_TYPE environment variable, you can choose to use a
different backend. Note: for some backends, other options may need to be
set.
Backend options:
| Value | Database | Other options |
|---|---|---|
| jsondb | JSON files in ./db |
None |
| mysql | MySQL or MariaDB server | DB_HOST DB_PORT DB_DATABASE DB_USERNAME DB_PASSWORD DB_TLS |
JSONDB
When using the JSONDB database, all of the data is stored in separate
JSON files in the ./db directory. This is the default database and no
special configuration is required.
MySQL
In order to use a MySQL or MariaDB server, you will first have to set
the DB_TYPE environment variable to mysql. You should then specify
the hostname or IP address of the database server using DB_HOST as
well as the port on which the database server is listening, if it is
different from the default of 3306. DB_DATABASE is the name of the
database that WireGuard-UI is to use. Please ensure that the database is
empty before you start WireGuard-UI for the first time otherwise the
tables will not be initialized properly. DB_USERNAME and DB_PASSWORD
should contain the login details for a user with the following
permissions for the database:
- SELECT
- INSERT
- UPDATE
- DELETE
- CREATE
- ALTER
DB_TLS sets the TLS configuration for the database connection. It
defaults to false and can be one of the following values:
| Option | Description |
|---|---|
| false | Never use TLS (default) |
| true | Enable TLS / SSL encrypted connection to the server |
| prefered | Use TLS when advertised by the server |
| skip-verify | Use TLS, but don't check against a CA |
After you have set these options, you should be able to start the WireGuard-UI server. The server will then initialize the database and insert the default configuration. If this process is interrupted, you will have to empty the database and restart the initialization.
Auto restart WireGuard daemon
WireGuard-UI only takes care of configuration generation. You can use systemd to watch for the changes and restart the service. Following is an example:
systemd
Create /etc/systemd/system/wgui.service
[Unit]
Description=Restart WireGuard
After=network.target

[Service]
Type=oneshot
ExecStart=/usr/bin/systemctl restart wg-quick@wg0.service

[Install]
RequiredBy=wgui.path
Create /etc/systemd/system/wgui.path
[Unit]
Description=Watch /etc/wireguard/wg0.conf for changes

[Path]
PathModified=/etc/wireguard/wg0.conf

[Install]
WantedBy=multi-user.target
Apply it
systemctl enable wgui.{path,service}
systemctl start wgui.{path,service}
openrc
Create and chmod +x /usr/local/bin/wgui
#!/bin/sh
wg-quick down wg0
wg-quick up wg0
Create and chmod +x /etc/init.d/wgui
#!/sbin/openrc-run

command=/sbin/inotifyd
command_args="/usr/local/bin/wgui /etc/wireguard/wg0.conf:w"
pidfile=/run/${RC_SVCNAME}.pid
command_background=yes
Apply it
rc-service wgui start
rc-update add wgui default
Build
Build docker image
Go to the project root directory and run the following command:
docker build -t wireguard-ui .
Build binary file
Prepare the assets directory
./prepare_assets.sh
Then you can embed resources by generating Go source code
rice embed-go
go build -o wireguard-ui
Or, append resources to executable as zip file
go build -o wireguard-ui
rice append --exec wireguard-ui
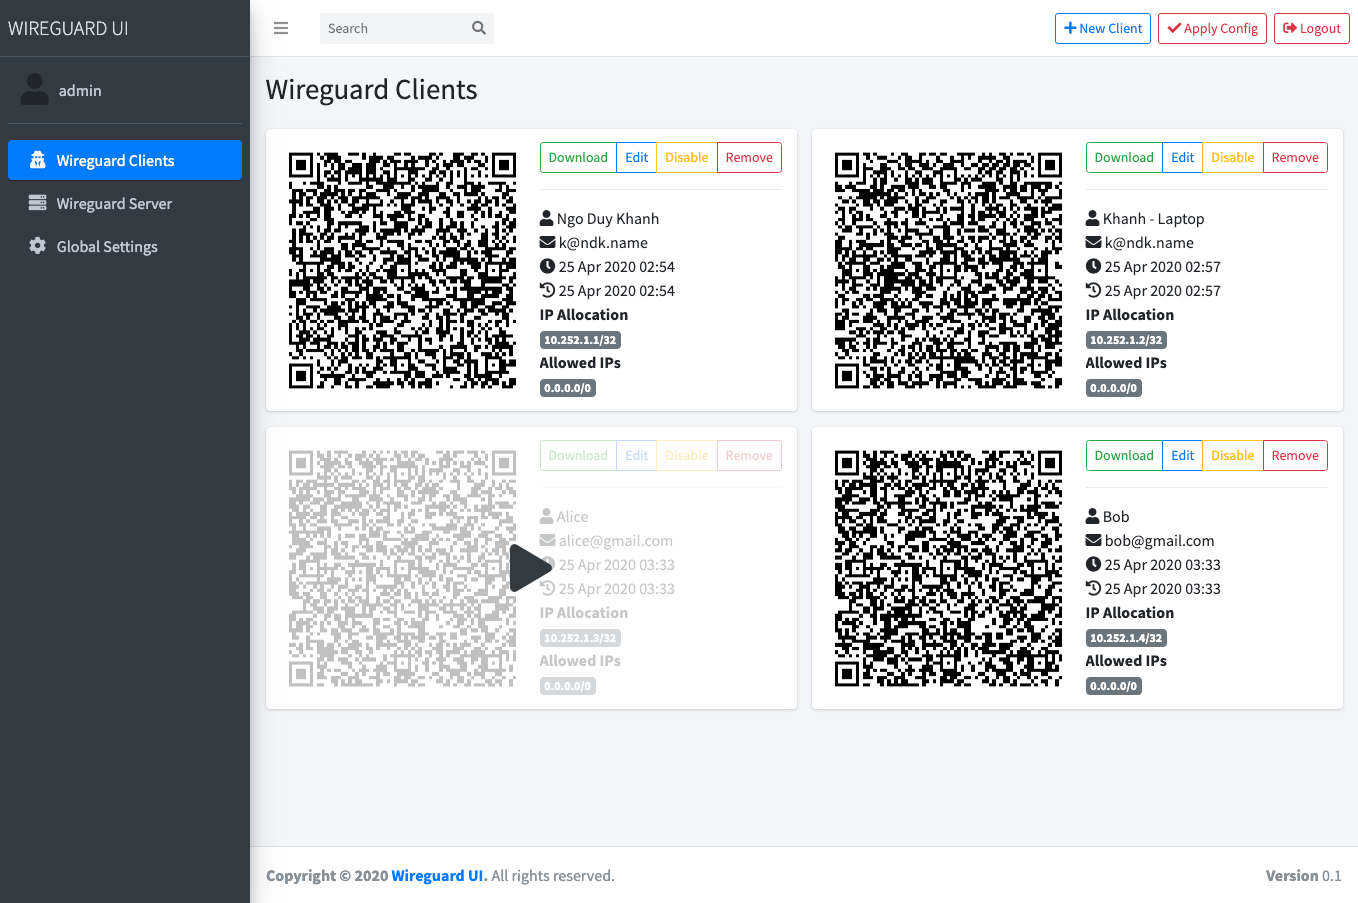
Screenshot
License
MIT. See LICENSE.
Support
If you like the project and want to support it, you can buy me a coffee ☕
![]()